
Well hello there all you crazy people. Did you miss me yet? NO??!!! Pssssh. LIES. You know you did. 🙂
Well since I think the majority of the Halloween Event is running down, the Level 36 surprise just smacked us upside our heads, and it is getting to that time where a lil fun should be had. So I am sneaking back in (shhhhh don’t tell Alissa and El Hefe I got out of the basement) and dropping another 3D 101 in all your laps. Don’t drop it, OK?
There are soooo many possibilities in the game for creation outside the box. Extra lil things here and there that can be done to add just a bit of personal touch and character into your game.
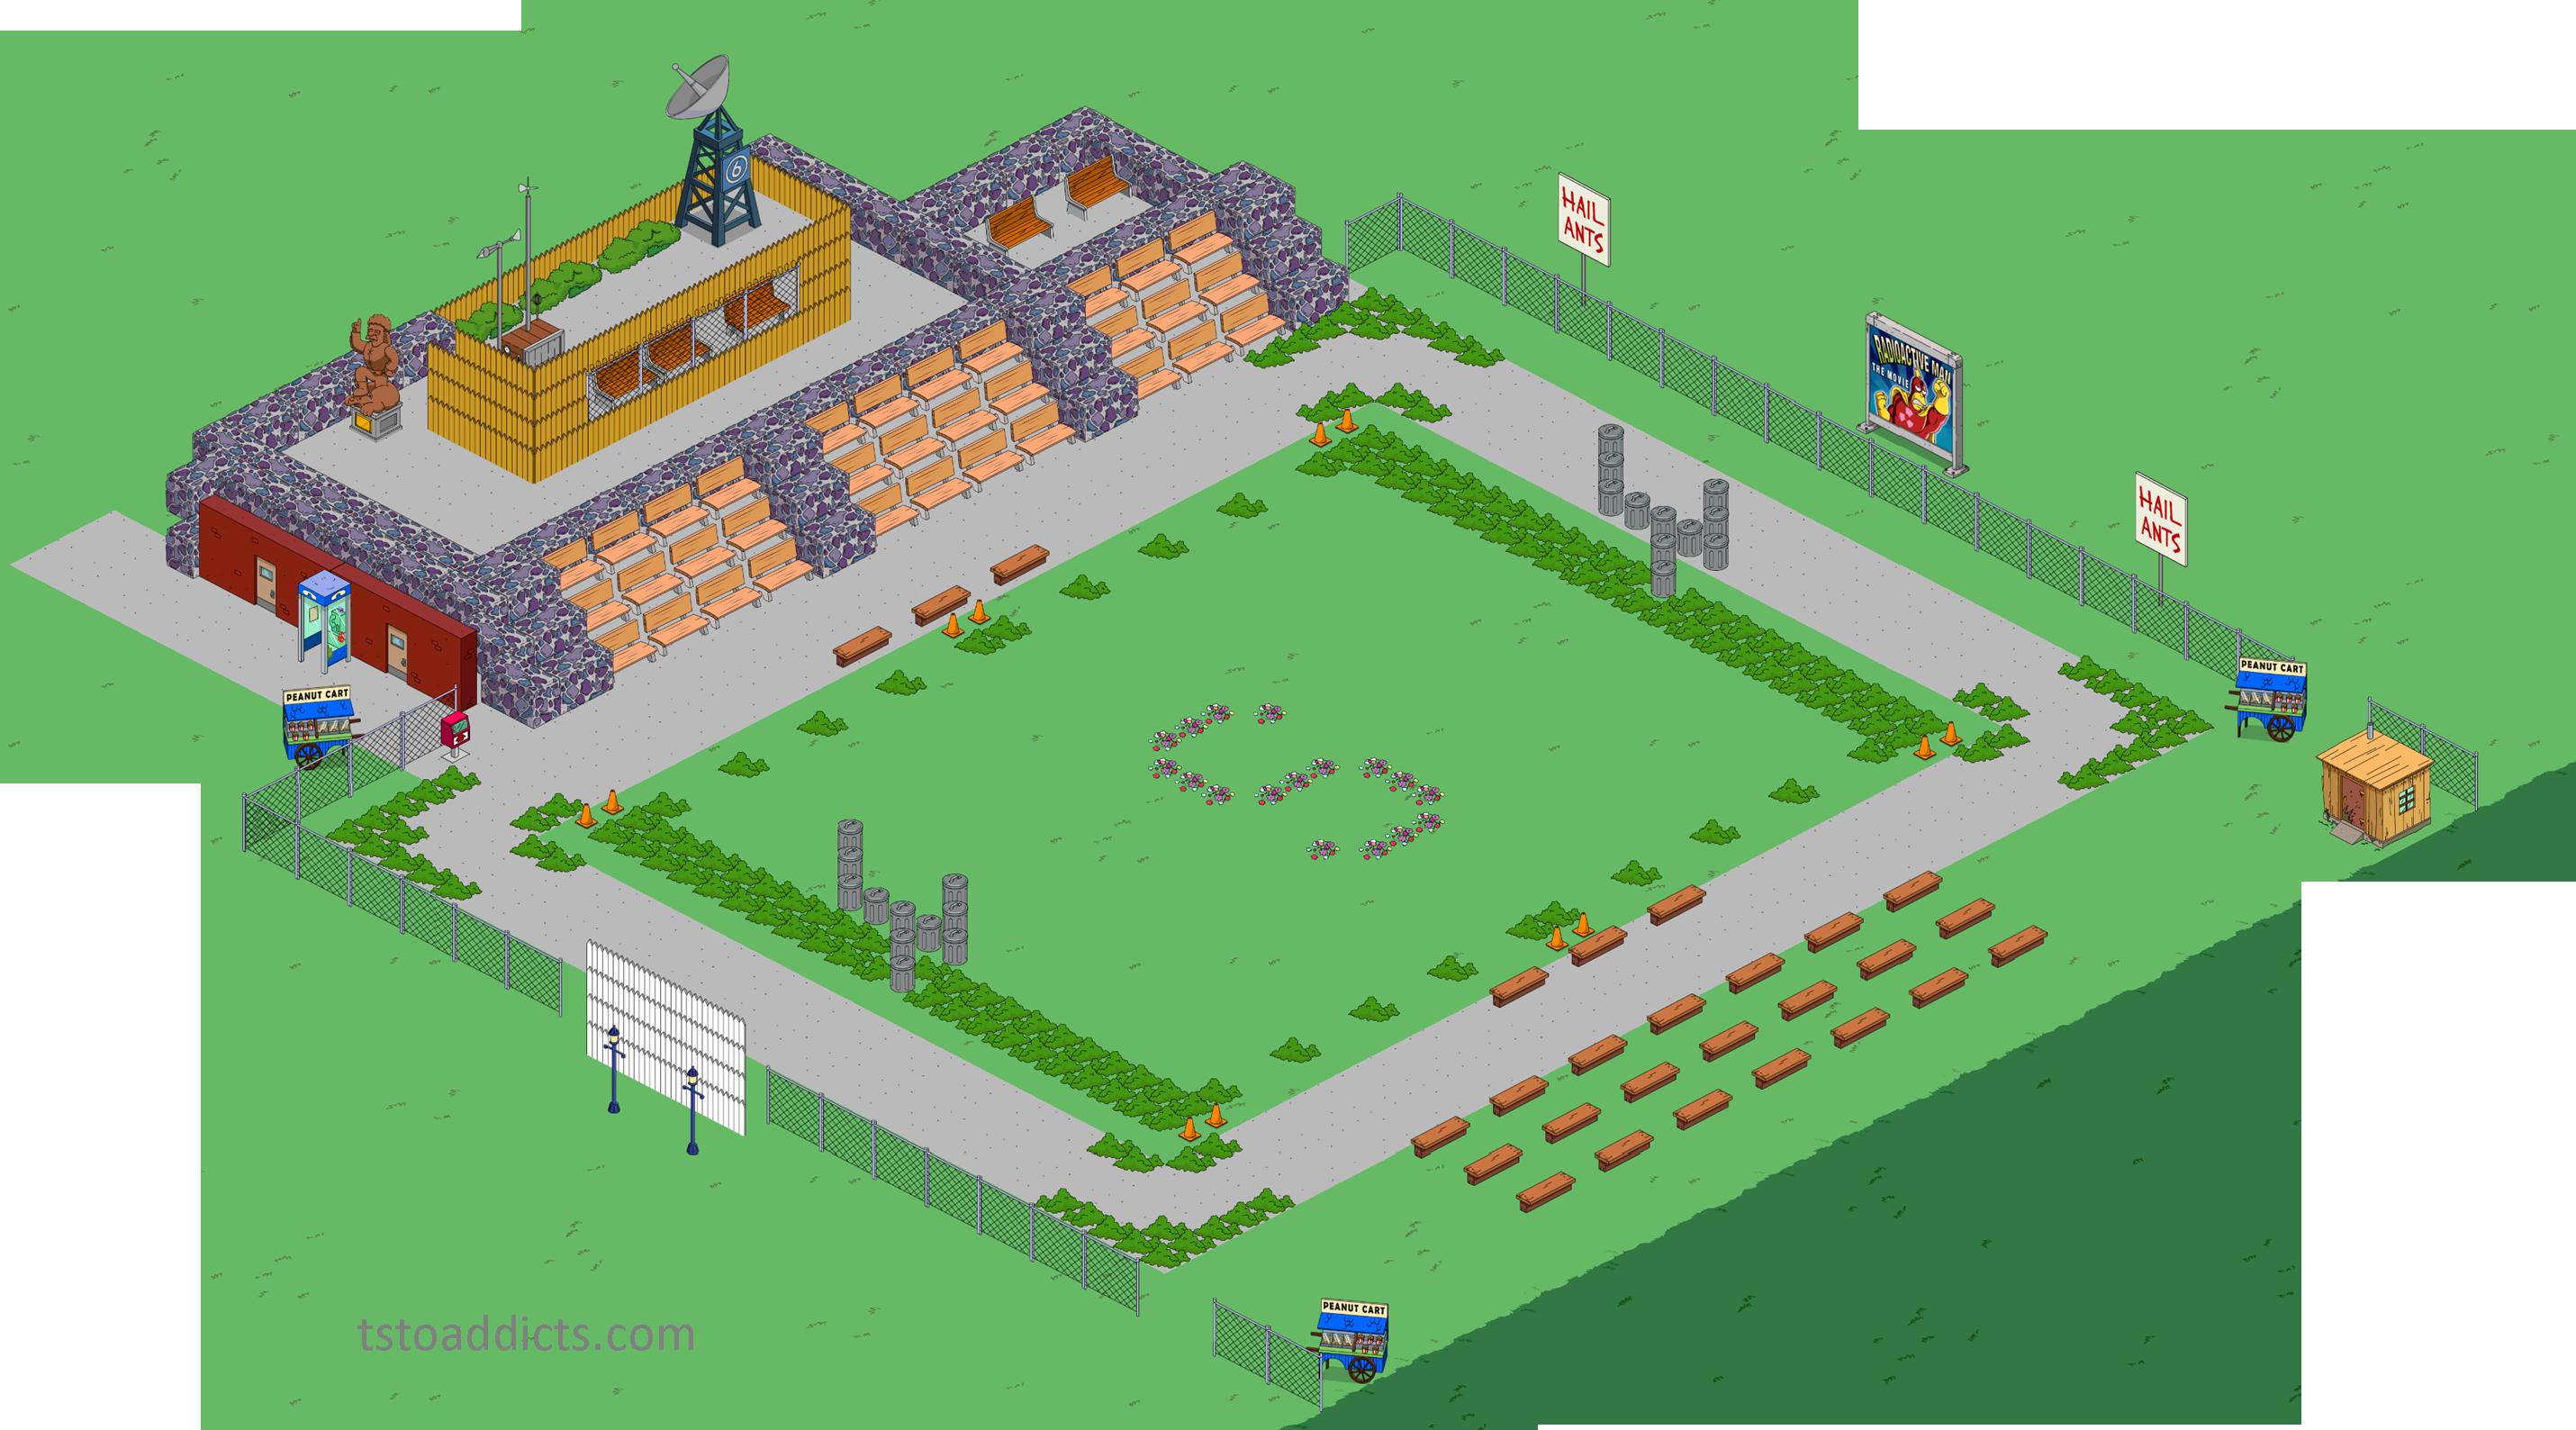
For this 3D 101, I will be going a little crazy (shocking huh) and making a football stadium for Springfield High. This one is going to be a little more advanced in details so get your munchies ready, drink in hand, snuggly blanky, and curl up for another walk through the madness of Bunny’s creative mind.
Where to start. Well, let’s get a general layout first. Due to a difference in space availability for everyone’s town, this can vary to fit the space you have open. I like to start by running pavement along and forming a rectangle. I can adjust this later if needed. Mine ended up 32 X 24, but I have room to spare for this. Adjust yours smaller to needed. Each pavement square is 4×4, so you will need to keep that in mind in making the change.

Next I use the Orange Cones/Pylons to start marking the center points around the field. This will help me to keep things lined up as I get going. The Pylons can also be used to mark each section in the field like 40, 30, 20, etc but I like to leave that til last. Final details. See if it helps the look or not.

Now with a general layout of the field, I will add the uprights to each end. Trash cans worked great for this in mine. They seemed to give it the right shape and look as well as help the 3D effect. Due to the size of my field doesn’t have an odd number, I set the uprights to the right of the center points I marked previously with the Pylons. Now placement of Trash Cans. 3 up center, 5 across, 3 up from each end point. Repeat for other side (you will need to move the Pylons marking the ends at this time so they don’t get in the way of the uprights).

Now for the surrounding area. I will start with the player benches on each side. Boardwalk Benches will go on each side right next to the field. I use the Pylons again to start in the center and work my way out with the benches. It is also at this time you can double check your Pylons to ensure the are in the center of your field. I added an extra Pylon just due to the even numbers make two central points.

Now on to the bleachers. Don’t worry, final details I like to leave to the end. Easier to move only a few items/decorations if a mistake is made vs several. We will be using the same step type 3D build I have shown you in previous posts for the bleachers. Again, using center point, I will be building up from the field. I like the look of the Cobblestone Walls, so I will use them for the structure itself. 3 steps up to the landing area for the press.

I will then place the next Cobblestone Wall right next to the top step and start running the stones out from the center. Placing the same amount as bleachers I plan on using. (For this project I will have 4 on each side).

Now to place the bleachers. You can use the step method from the bottom up, or start at the landing and work down. Either way, make sure they are in a step style pattern (the item above is just one up and over from the one below). There are 3 benches you can choose from. It depends on how much you want to spend. For this, I picked the lighter wood Bench ($270).

Now to close off the sides. Add more Walls to each edge using the step pattern with the last one lining up with the landing area at the top.

On to the landing itself. You can extend the pavement up under the bleachers from the field and create a surrounding landing area at the top. I will use the Cobblestone Walls again to line the two sides of the landing. Leaving the back wall for later.

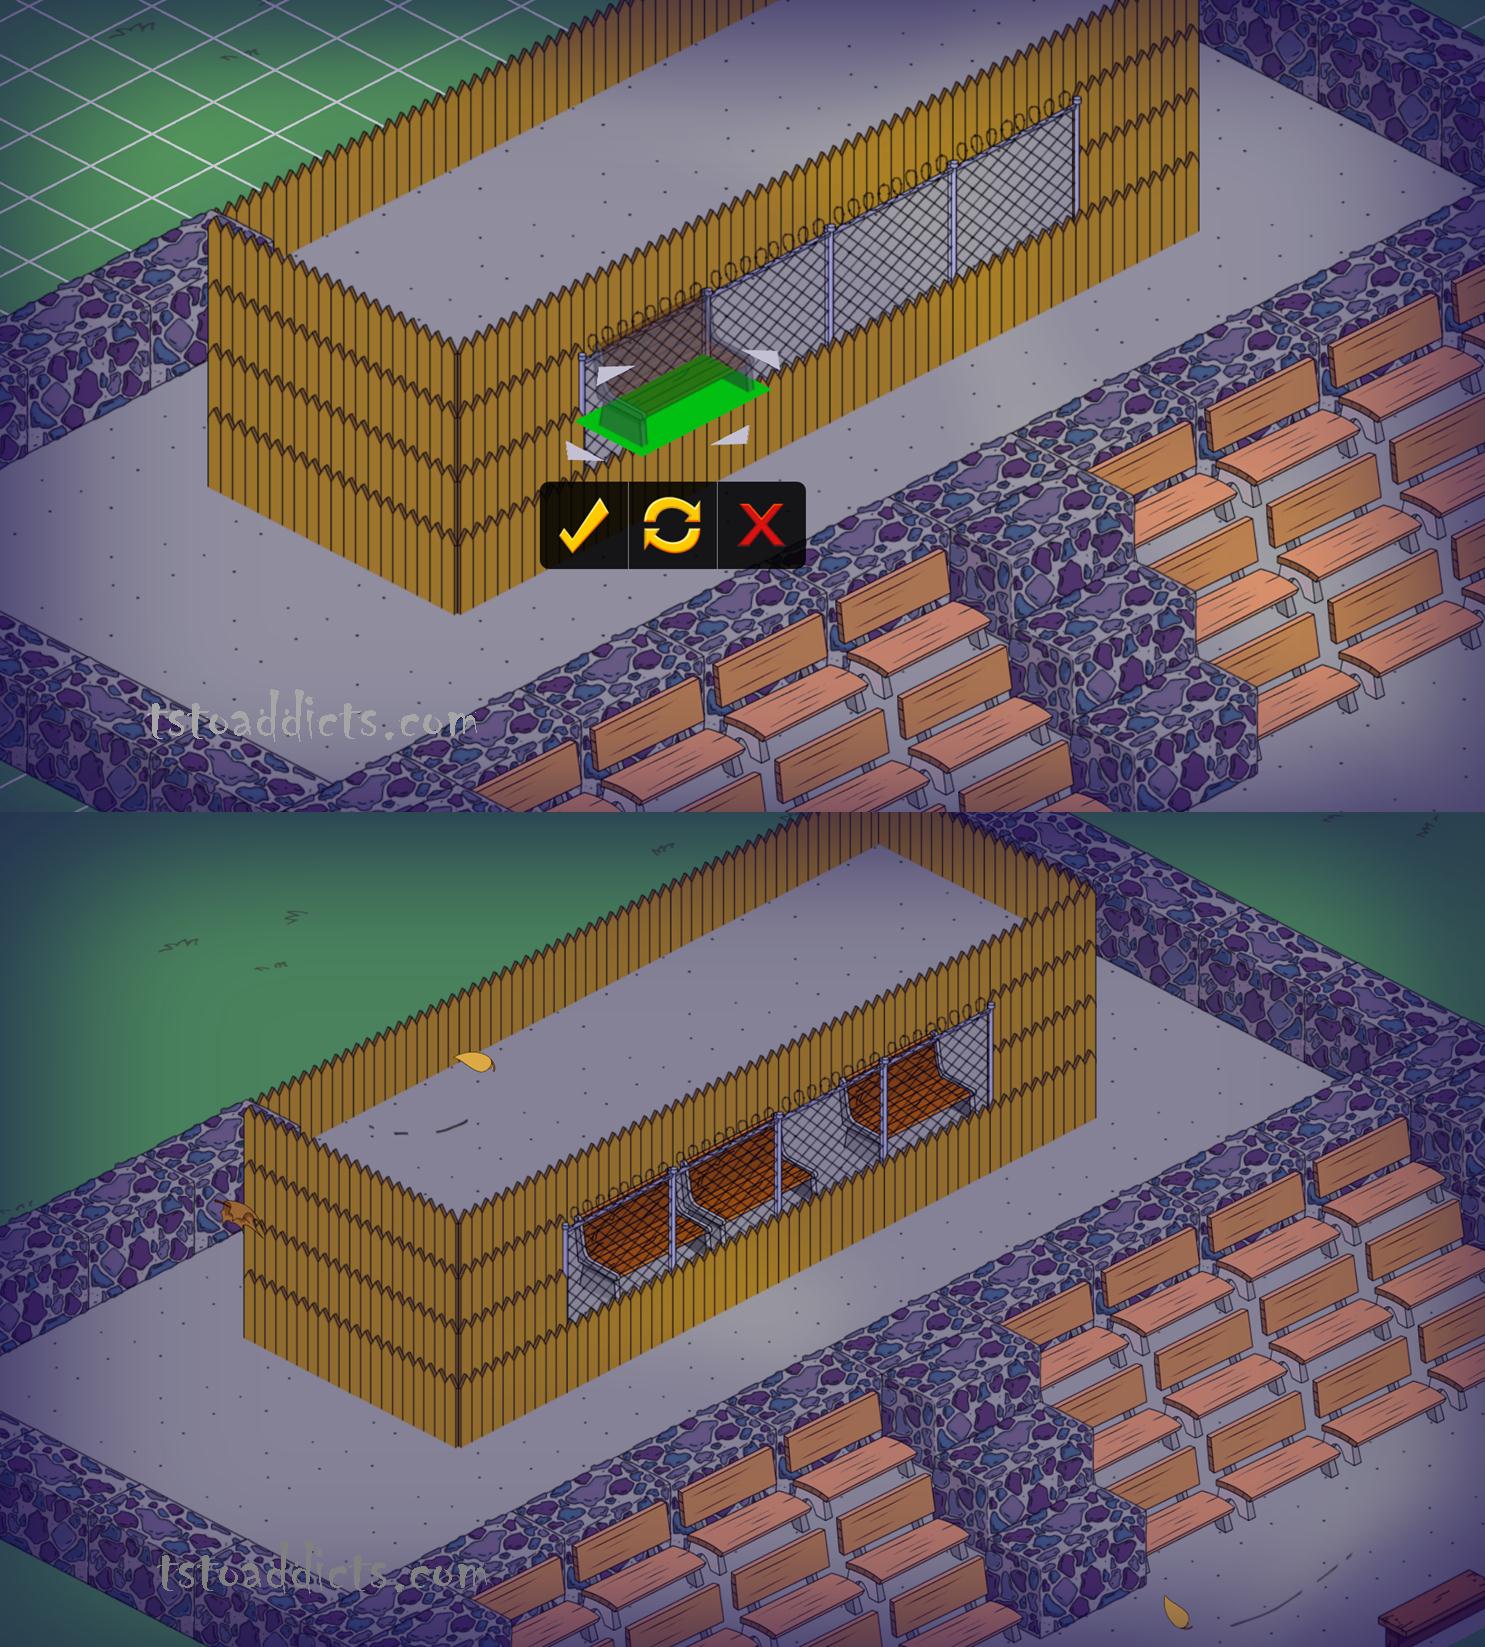
Now to use the other method I have taught you, creating a structure with windows from fences. I will be using Wooden Fences and Barbed Wire Fences to create a 4 level high structure. A Press Box. I again use the center point to determine placement. This time setting the first fence just to the right of the center point. Don’t forget to point the fence outward.


Depending on how close to the edges of the landing you place the Press Box, you may not be able to point all pieces outward as you reach the top. that is OK. The main part is to make sure the ones in front faced out.
You can finish off the back wall of the landing next. It will only take a few pieces until you run into the back of the structure.
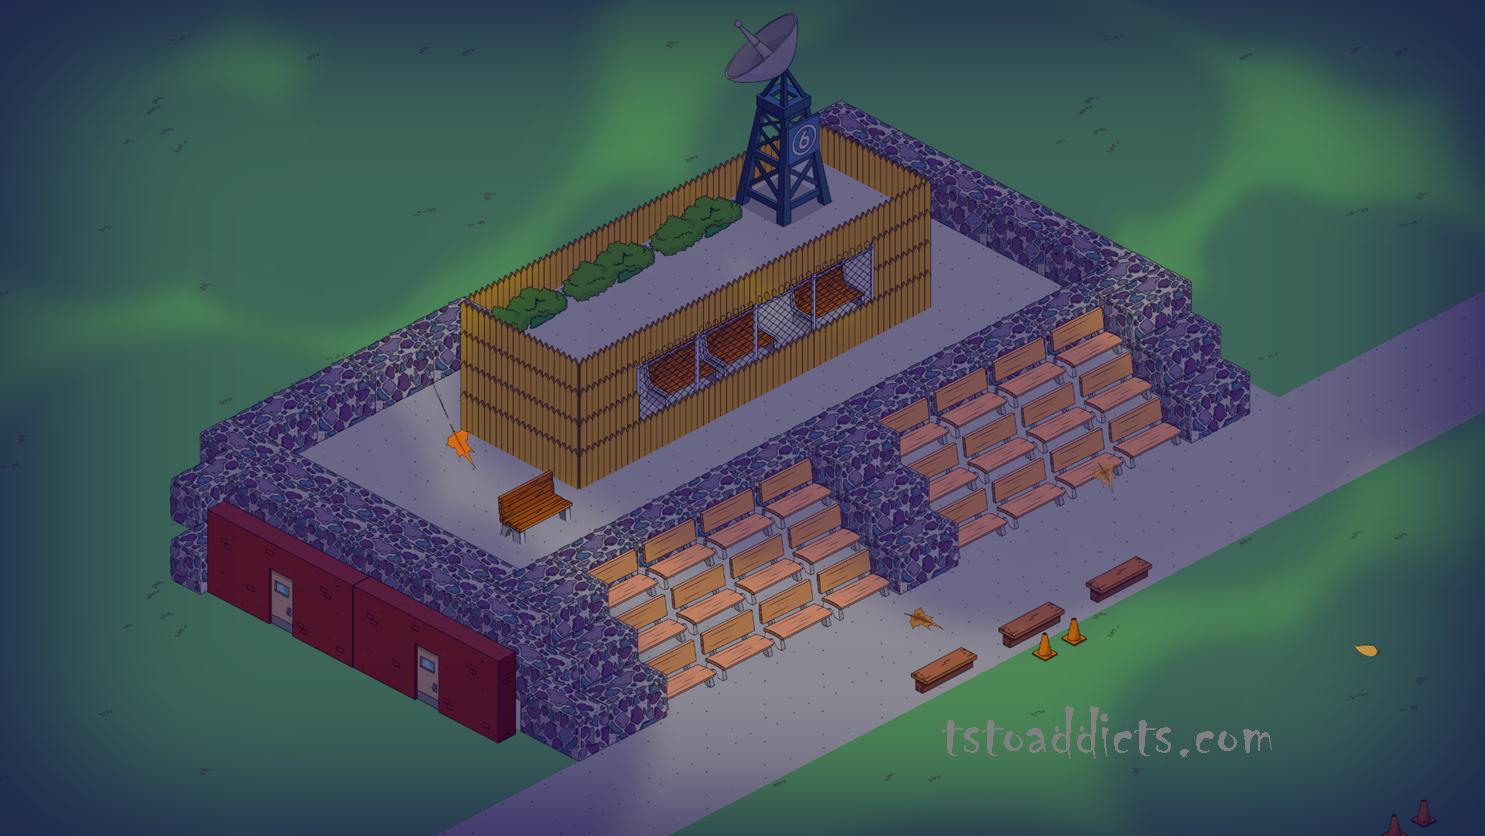
Now to start adding details. Starting with the Press Box, add a bench or two “inside” the Press Box (this is where that face out comes into play). It will give appearance the seating is behind the “windows”.You can add a bench outside on the landing. Iron Gates to the roof of the Press Box. Basically what you feel will start to finish off the area.
I decided to add a few shrubs and a Worldwide Broadcast Dish. The Weather Station also looks cool as an antennae on top. Now for the rest. Finish off the remaining open side off the landing and bleacher area next. I like to use the Training Walls to give the appearance that there are bathrooms/locker rooms that run under the bleachers. Filling in gaps with more Cobblestone Walls.
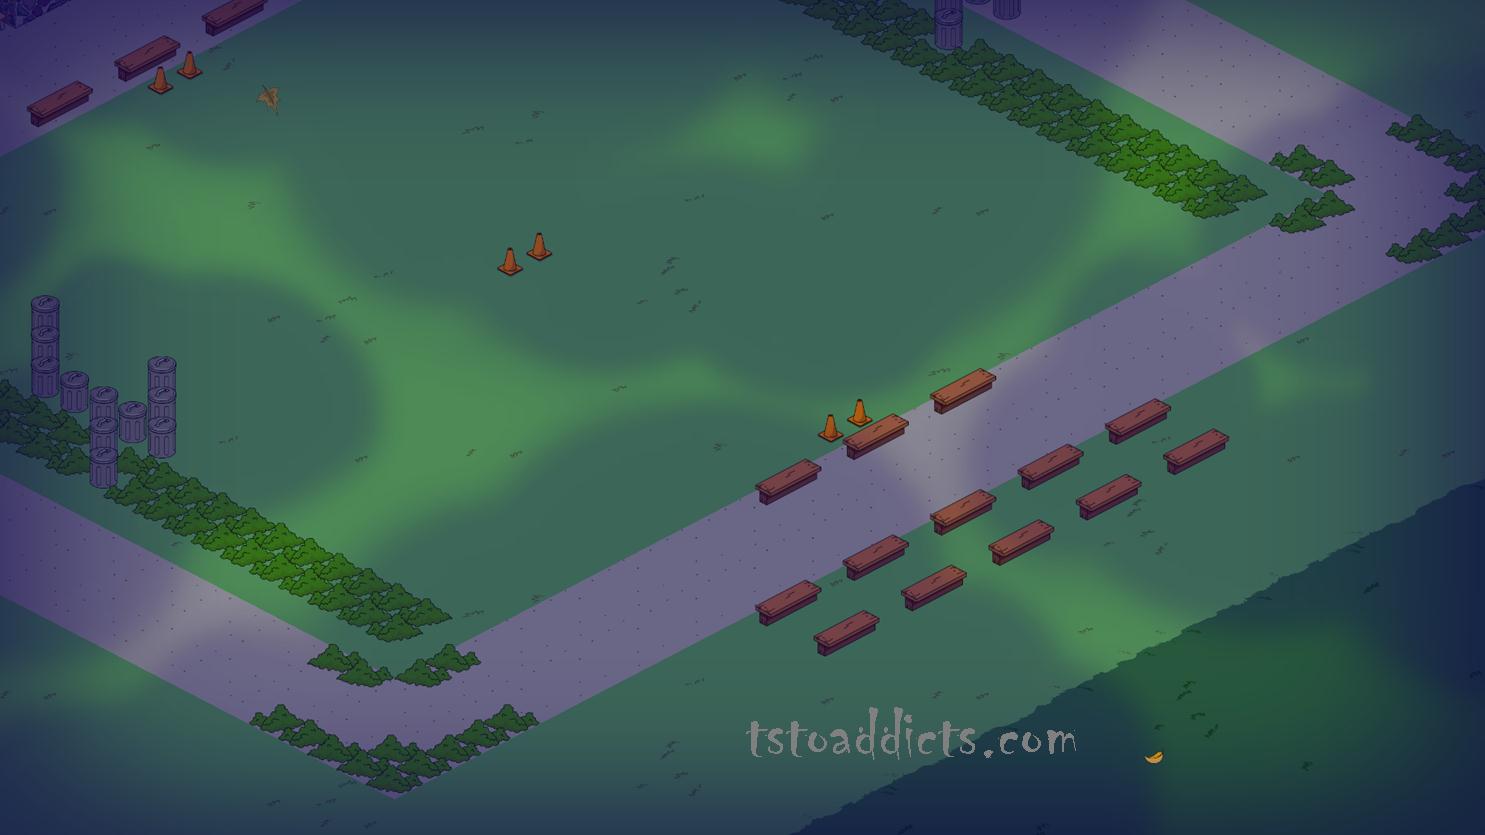
Back to the field. I like to surround the corners with the Small Shrubs, almost giving it more of a track and field look. Then fill in the end zones with Small Shrubs too.

Give the away team bleachers…but the crummy ones using more Boardwalk Benches. Lol
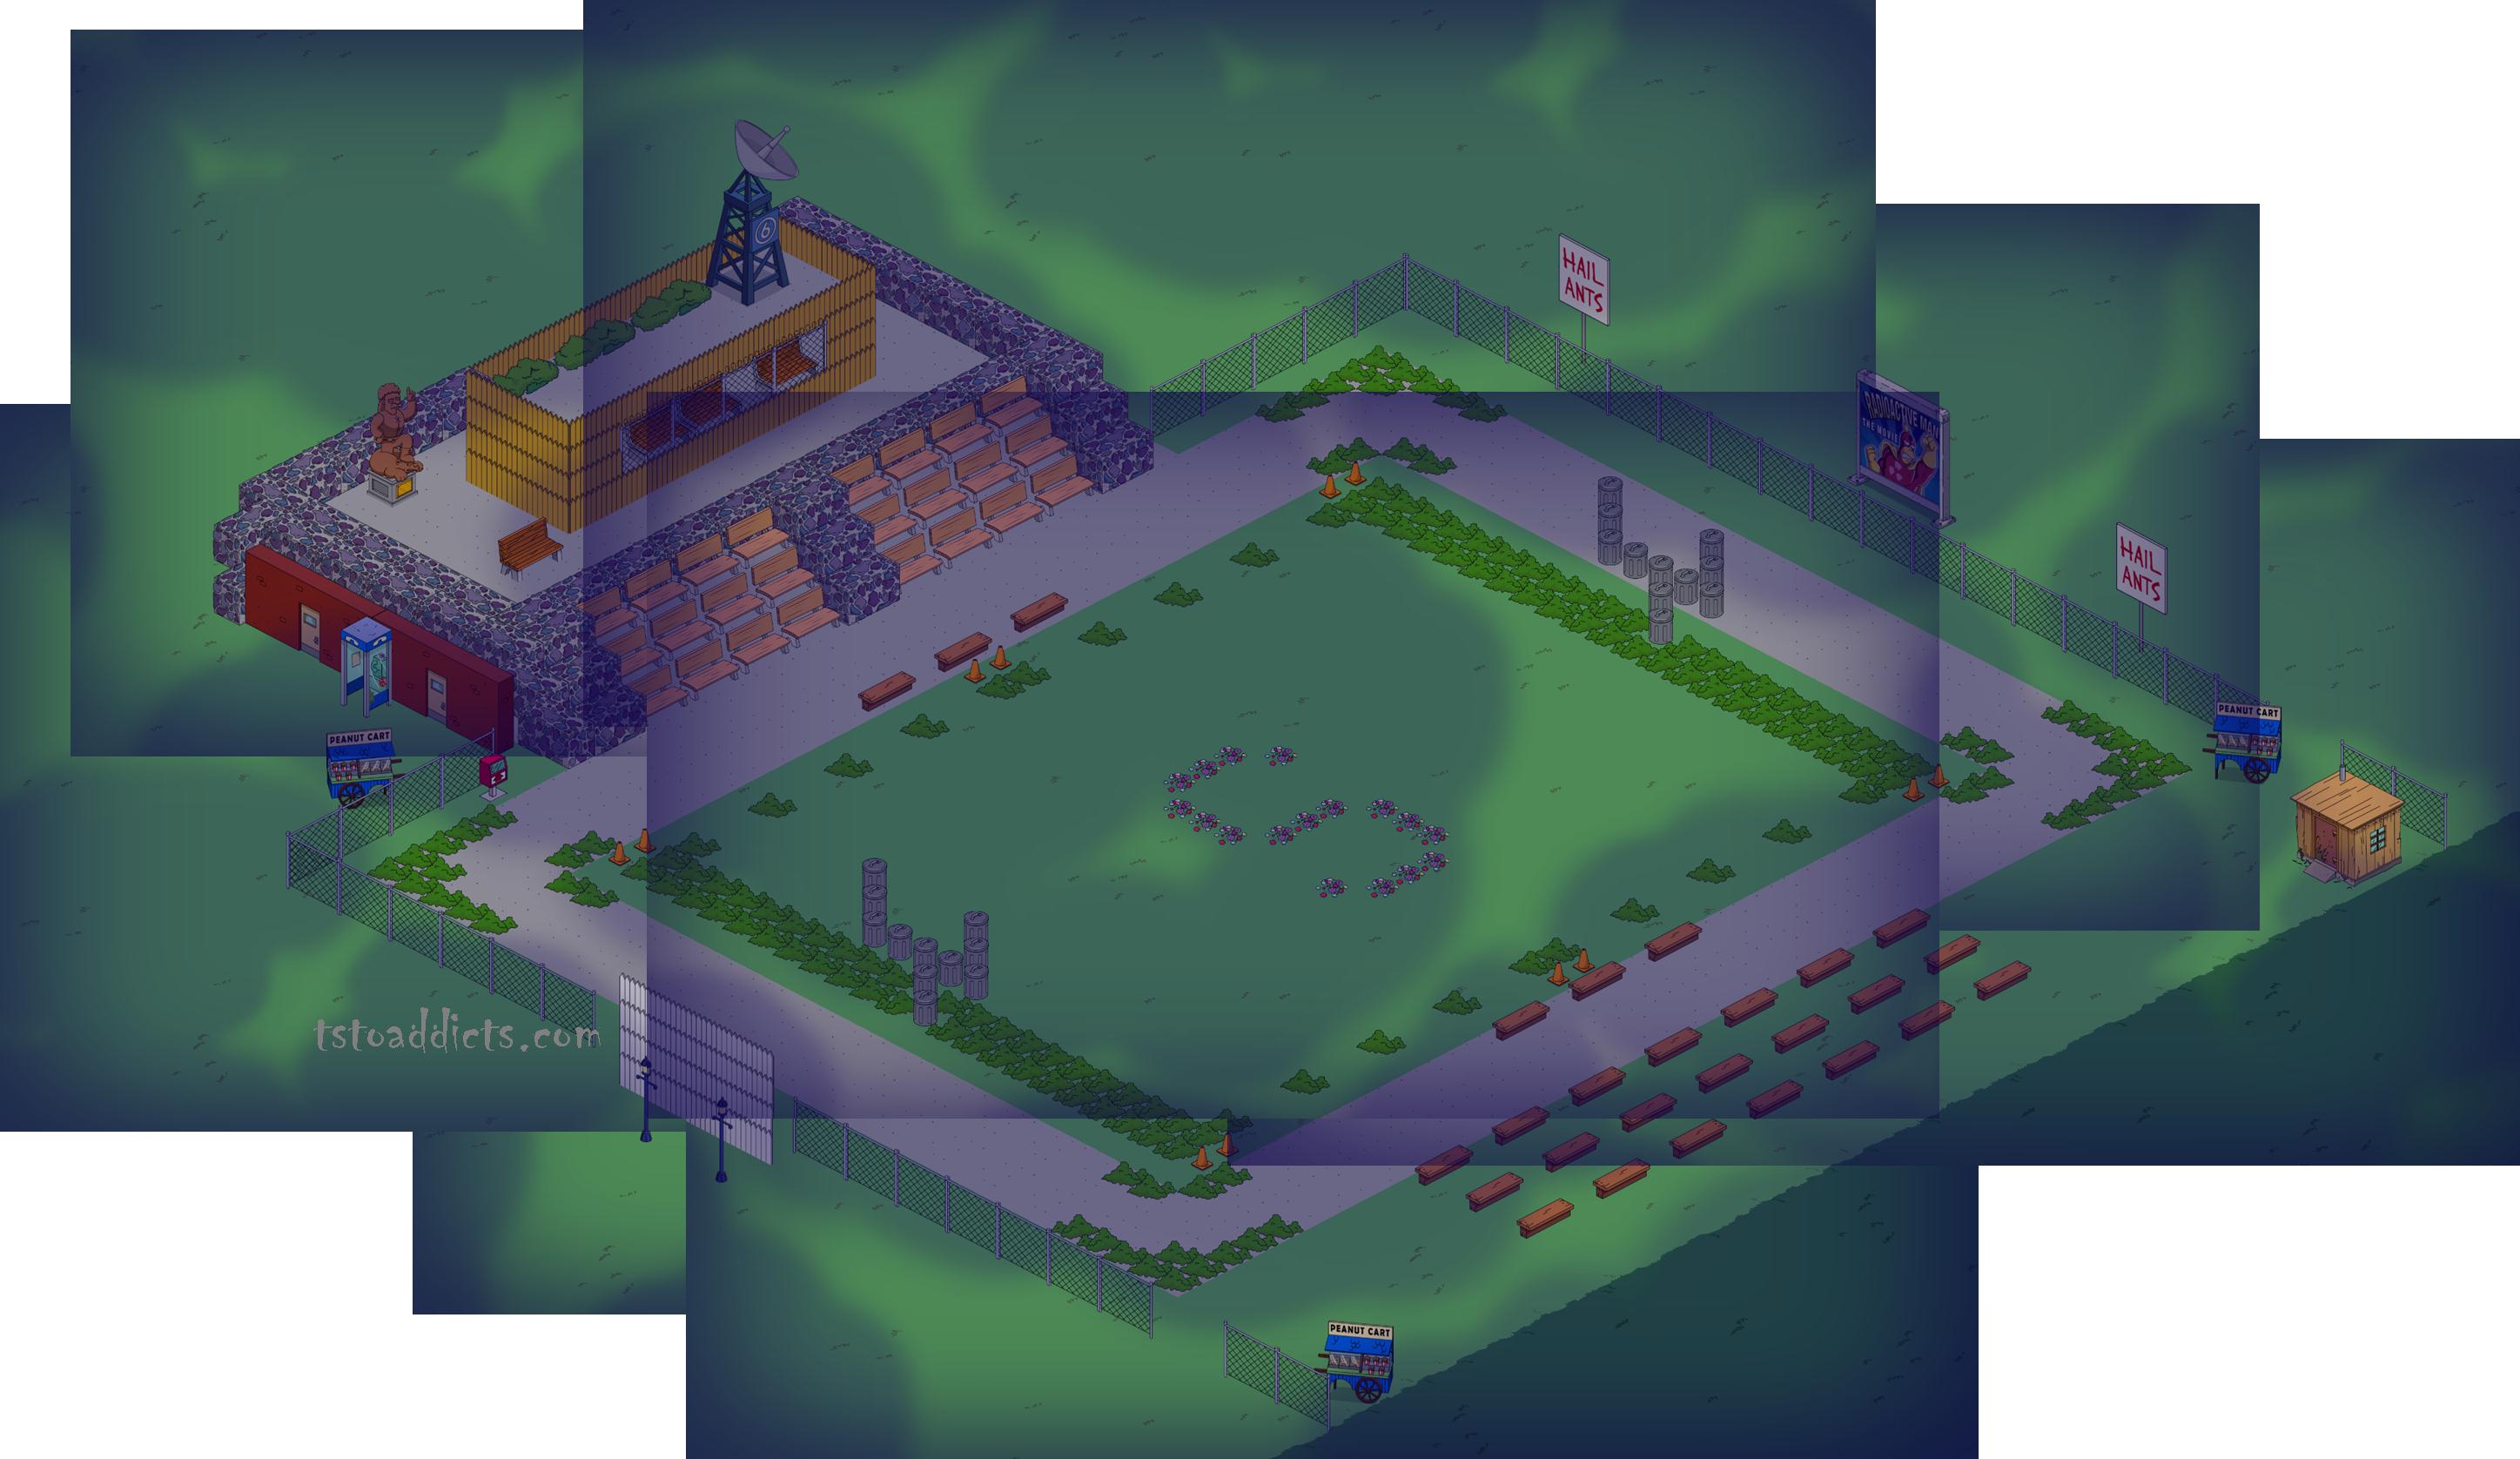
Add a Scoreboard using the regular Lamp Posts as…well…posts and White Fences for the board itself (Wooden will work too).
Anything above and beyond this is all additional creation. In retrospect, my field is a tad bit large. This could have been altered to be smaller. Or I also can add more bleachers and widen the landing area to offset its size. In the end, here is the overall result minus the few changes I just mentioned. (If the trees were not so bare, I would’ve placed more of those around as well.)
This is another one I was playing around with before the mist fogged up all my photos.

I hope this has sparked at least a little inspiration in you to add more personal touches to your town. Feel free to show off your work to the “class” via our Flikr page.
http://www.flickr.com/groups/tstoaddicts/
Until next time.
***Bunny***
#heartandsoul
personality #21
UPDATE: Here is the football field…tweaked a lil…mist free. 🙂


What a talented creator. Thanks for sharing!
Bunny, I love your football stadium (and this site overall)! Stealing that for my town–I mean building that in my town as we speak. But here’s the problem I’m running into. My cobblestone wall overlaps my wood fence. In your last picture (the update), this happens to you too. But in most of your pictures, it doesn’t. I’ve tried facing the fence “inside” and “outside,” and I’ve tried putting two fences in the same spot (one facing inside and one facing outside) to no avail. Is there a trick I’m missing?
Thanks! 🙂
As far as the Cobblestones vs Fencing, it is something you gotta play around with. You can even add another decoration in front of the “oops” area to hide the overlap. Or try moving the Cobblestone so it is not so close to the fence and again… put something else near that area in its place to hide the face there is not something there. 😉
That is a “trick” I use on many items I play around with “Hide” the funny spots with trees, shrubs, phone booths, or any other item that fits with the motto of the area and will work. Hope that helps. 🙂
Yes yes! That is very helpful! You’d think, after the *hours* I’ve spent reading this site I would already know that. I just put some trees in front of doors on training walls *yesterday* per one of Alissa’s posts that she, you and Wookie do that kind of thing *all* the time–and poof! My Righteousness rating is back where I want it to be! Thank you for such a speedy reply!
Lol. Happy to help. I made an extension to Wolfcastle’s house using the training walls. Almost a “garden” area. Covered the doors too with Trees and other items. 😉
Fun lil tricks to help make your town design work with what you want. I also use this when I don’t like signs in front of things (like the Castles and Springfield Falls) I cover them to hide them… then it is just a location and no name. 😉
This is freakin’ genius!
.
Lol. Thanks. 😉
I did it during a “foggy” time so it wasn’t as clear. But once the fog disappeared, you could see it so much better.
What did you use to make the ‘S’ ?
Those lil teeny tiny flower patches that barely cover a square of area. They worked great. This design is STILL in my B town. Lol. One of the only things I didn’t pull apart…yet. Kind of fond of it. 😉
This is so clever, love it.
Thanks 🙂
love your work ! would love to see your town my self
Thanks 🙂
You’re all gonna see it soon. Keep your eyes open to the blog. Fun stuff coming up soon in Bunny’s town with readers involved. 🙂
Great work bunny!
You’re one of the best 3D artist I’ve ever seen!
Awwwww well thank you 🙂
I appreciate the compliment. I feel I still have so much more to learn in creating. I do enjoy it 🙂
very, very cool bunny. what do you think in the vein of paintball/obstacle course?
Thank you 🙂
I played round with a kind of obstacle course by my police station. It’s still there now. I want to elaborate on it. When the mist clears…a town remodel will start for me. I have more ideas I want to try.
i actually got to tap your town without too much resistance today! 😀
Woohoo! I set up a secondary game. Pulling my art over to it. My main game will have a set 2D once the event is over and the mist is gone. Figured this will make it easier for neighbor visits and less freezing issues. 🙂
And it will make me stop yelling at Bunny (and Wookiee) because their towns crash my game! Even if they are amazing! 🙂
(She’ll still yell at me. Lol)
😛
thats very considerate. thanks a lot bunny!
No problem 🙂
No point in trying to show off my work to neighbors that can’t even get in and enjoy it, right? Lol
Great work Bunny!
Heheheheh so nice you said it TWICE? 🙂
(Had to push both…made me smile)
Great work bunny! 🙂
Thanks Shelf 🙂
I agree bloody good. What I like is the maximum use. Of frees items
You guys 🙂
I do try to use items that anyone can get for the art. I did splurge a little on this one, but those items can easily be swapped out for similar other items. I do have fun making them. 🙂
Pardon my language… but you are BLOODY good!
Awwwwwww. Thank you very much for the compliment. 🙂
I wanted to keep going. Do more. Add more. But I needed to post it 😛
awesome job!!, you could use propane tanks to make hash marks on field
Thanks. I did try them before. I wanted something flatter to ground. They do look the closest to hash marks in all the decorations. I figure I’d leave the extra tweaking to the readers to try. 🙂