Hey there Addicterinos!
Bunny apparently got grounded in the basement so I get to show you how to make a 3D this week. There really is nothing quite like using decorations to “trick” the eye into believing there is something extra.
For this week. I’m gonna show you the build process for an outdoor theater.
You may have seen something similar to this in your neighbor’s towns. I first came across the idea for this when I saw all the Drive-In theater’s folks had created. Here’s one that my neighbor Shelfie created.
I really like this idea but did not like the fact that the way the cars face makes it impossible to have the windshields point towards the movie. For this reason alone I didn’t make one.
Then inspiration struck one day that I could build one in my park for people, not cars. Here’s how you to can build a park theater. (It really can go anywhere but I like it in the park.
Built this for you in my B town and decided the theater should be down by the beach. Using the $135 fences, you have to pick the width of the screen. I made mine 8 fences wide. In each image that follows, I show which way I faced the fence. If multiple are in a line, all face the same way. Make the front screen five high and make sure to leave the center open for later use.
Now you have to box in the top of the theater (think of it as a giant cube if that helps). I placed two fences in a row on both sides to give landmarks to work with. For the 3D effect, I had to widen the screen on the right side. You can see I flipped the fences a different direction to accommodate this. I then started working on the bottom right border.
Continue to build up that right side of the screen. Once you have it four high, use a line of fences to create the boundaries for the roof. This also creates a sloping 3D effect later.
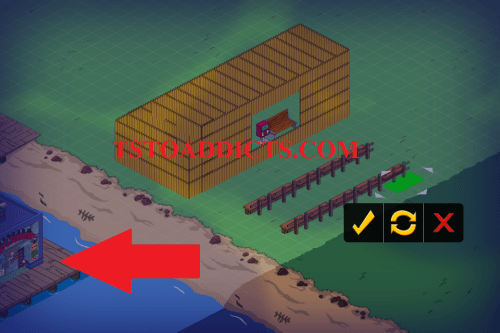
Now you just use two fences to fill in that gap. All the other open green areas can be closed up using the two fences in lines vertically. It is possible to do them horizontal as well but I prefer this look.
I now throw in one last little fence to close an edge I didn’t like. The last step is to pick what is going to be on the screen. I like the effect of using the Radioactive Man Billboard for this but as it costs 30 donuts, I’d understand if you used whatever you desired. If the billboard is used… you will have to close the gap using more fences.
Anything can go in the gap. You just need to make sure you have enough space. If you got rid of one more fence on each side, you could make a community theater stage. I chose a bench and mailbox to make a scene from Forrest Gump.
Last step is seating for the audience. Using the boardwalk benches and fences you can make pretty cool chairs. Just note that you have to be on level 15 and have the Itchy & Scratchy store built to use these decorations.
And there you have it. You can tweak this design to your hearts content. If you stick with just a simple square, it can be the beginning of a drive-in. Ultimately, it’s whatever design makes you the most happy with your town. If your designs please you, odds are other people will be pleased too.
Hopefully this whole thing makes sense. If you have any further questions… please let me know. TTFN… Wookiee out!


very very cool. alunited1961 made a bumper car cage, I took that idea and made it my own in building a different version to suit my liking. and I’m working on a parking garage for my hospital. I did a very cool one for my girlfriend at her stadium 🙂
but I’m going to go make a drive in right now! thanks fuzzball!
I actually have it planned out to make a 3D and this project is exactly what I was looking forward to do so thank you!