
Following the same path of wanting to be different than other TSTO sites, we introduced design How-Tos to TSTO Addicts back in 2013. Mostly based around 2D and 3D design work. Really intricate design work done by some really talented people.
Wookiee, at least to me, was the King of 2D/3D designs. It’s one of the major reasons I asked him to join Addicts when we first started. Little did I know I’d be getting so much more than a 2D/3D designer! Wook would break down some of his most intricate designs from his Springfield into simple steps anyone (and everyone) could follow.
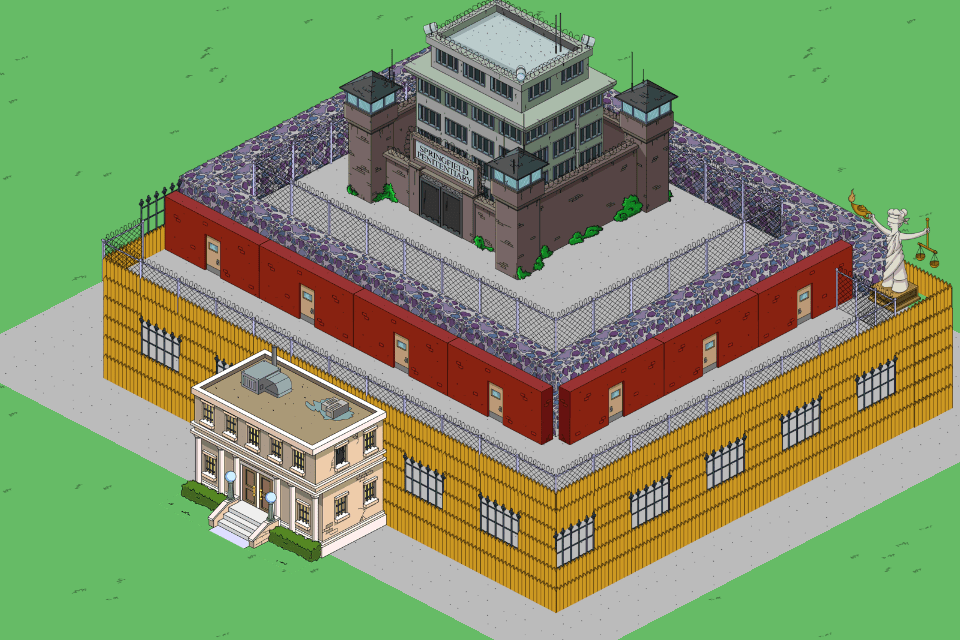
While we’ve had loads of 2D/3D posts over the years, the one that always stands out the most to me (and was the most duplicated by you guys) is Wookiee’s Mega Prison! So it’s time to turn it over to Wookiee and take a look back at the Mega Prison how-to…
From Wookiee’s 3D 101: The Mega Prison, originally ran on January 23rd, 2014…
What’s up Addicterinos? How’s Level 38 treating you? Feeling burdened by all the “legal” stuff that came with it? Yeah… me neither.
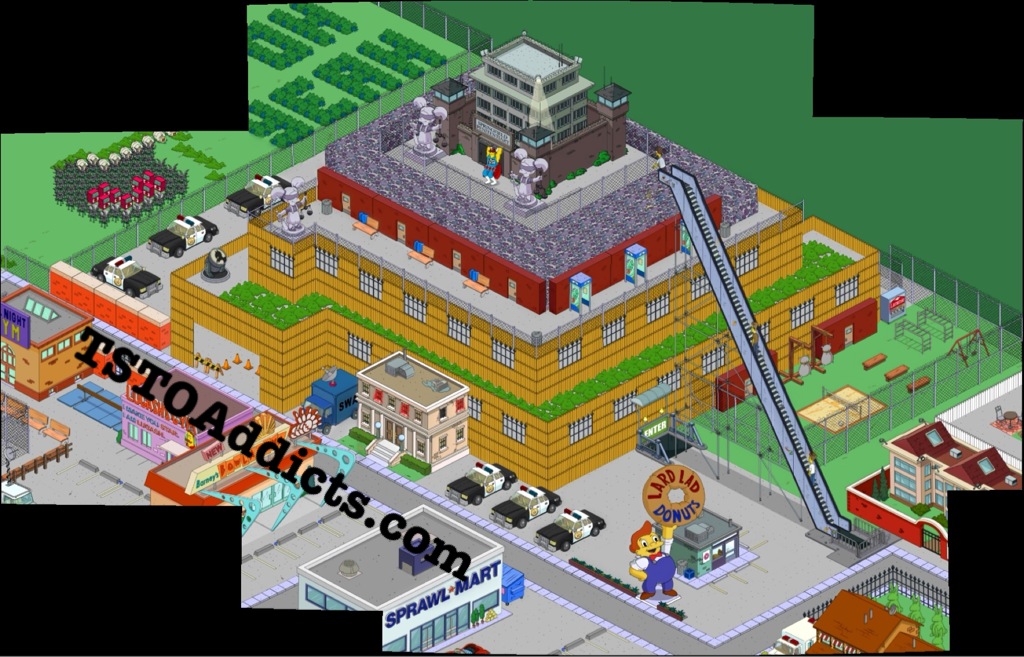
Love them or hate them, every country has its very own Legal/Justice system and it really should be no surprise that our very own Springfield is no exception. Sure there may be only 3 cops, one lawyer and one judge right now, but there are no fewer than 6 characters that can spend time in jail or prison. With that ratio, I’d could see the potential for Springfield’s Justice System to become overburdened and I thought I’d take action. You’ve probably seen this before, but here’s my Springfield Mega Prison….
This image comes from my first shot at the design. I was inspired by a tapper named Phillip who had made a pretty sweet Krusty Brand HQ Skyscraper. Another awesome creator named Meldesigner is also well known for amazing skyscrapers. I love designs that inspire and these were no exceptions. I thought to myself, “Self. What if you made a bold and dynamic 3D design using brown fences that pays homage to previous designs but is your own thing?” Well, the answer was this design (which had changed some from this image) and yes I sometimes talk to myself.
I’ve shown off this 3D about as much as one should without getting some help for Narcissism. Without fail, every time I show the image, someone wants to know how I did it so I thought it might be nice to return to 3D Thursday and show my favorite readers how they could create a Mega Prison of their very own.
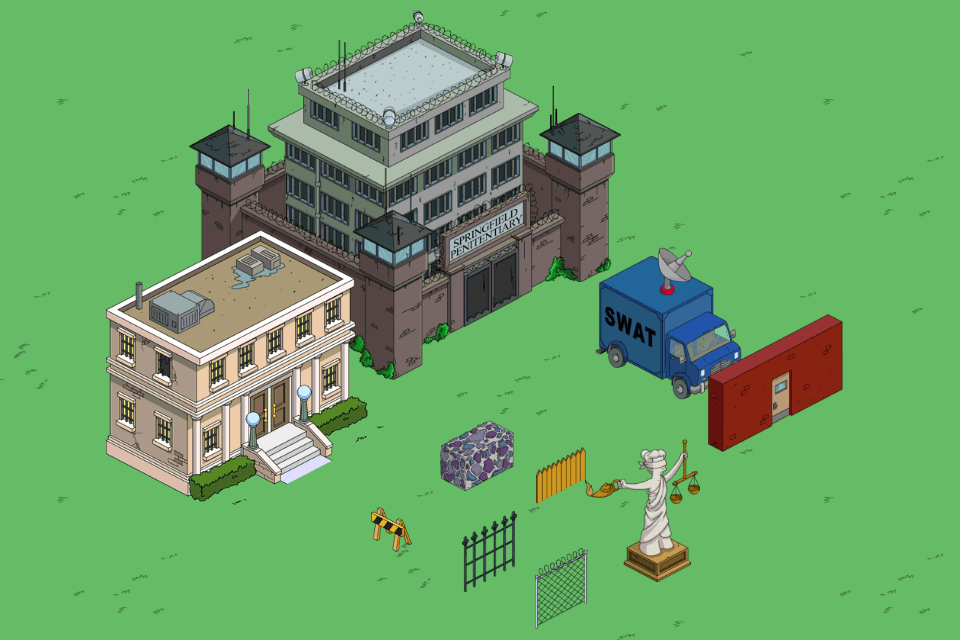
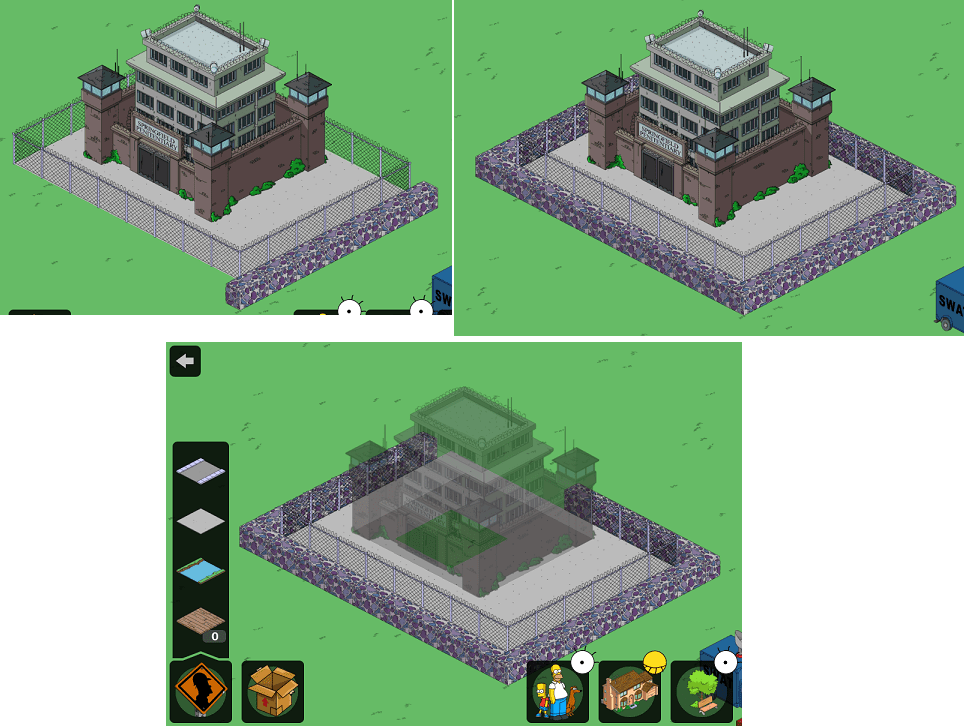
Without further rambling, let’s get started. Here are some of the decorations and buildings you can use for the design.
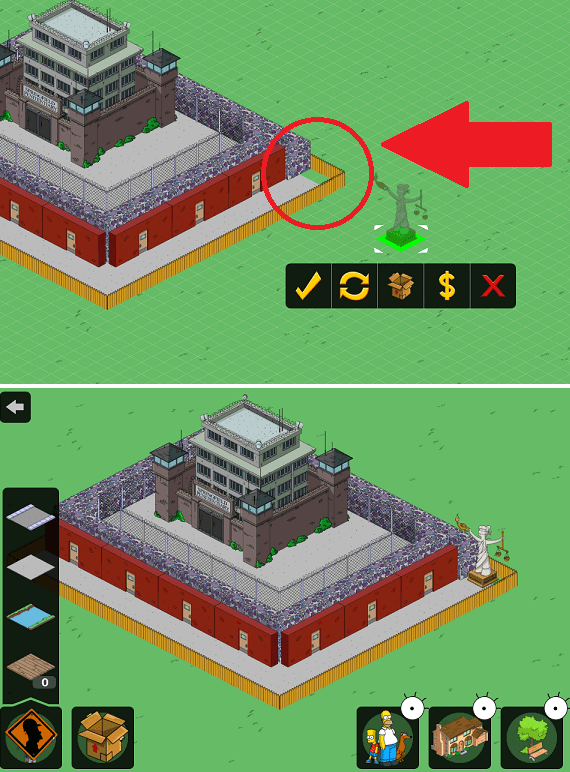
First thing to do is to lay down a 4×3 section of pavement. Once you have this down, place your prison on top of the pavement.
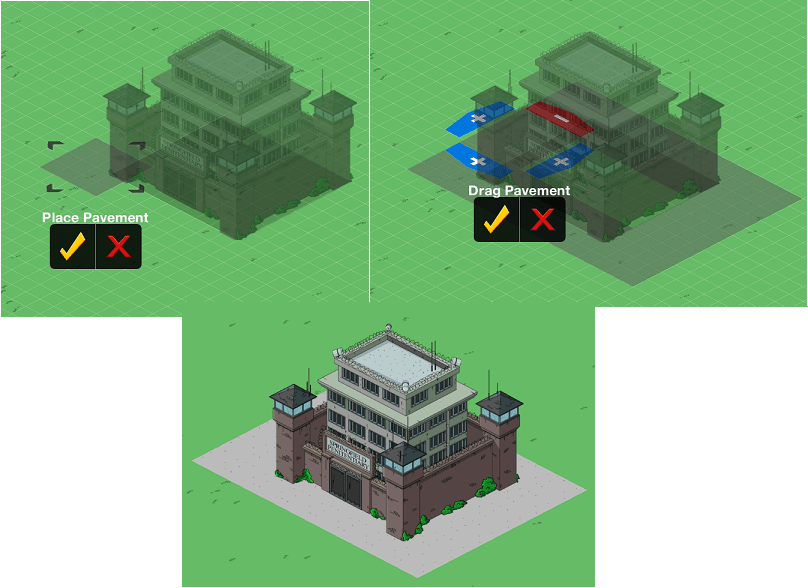
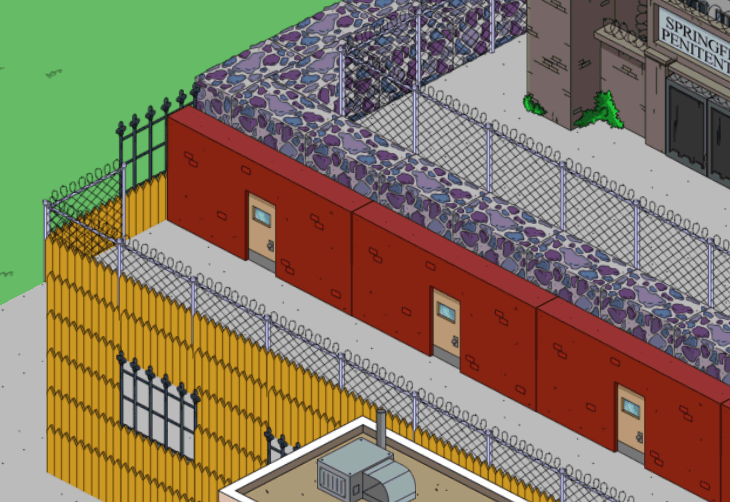
Facing barbed wire fences towards the prison, line the outside of your pavement. If you look at the bottom image of these 3, you can see you don’t have to complete the rear fence line. You can also see I moved the prison because I liked the perspective better with it slightly to the left. This required me to lay one more square of pavement.
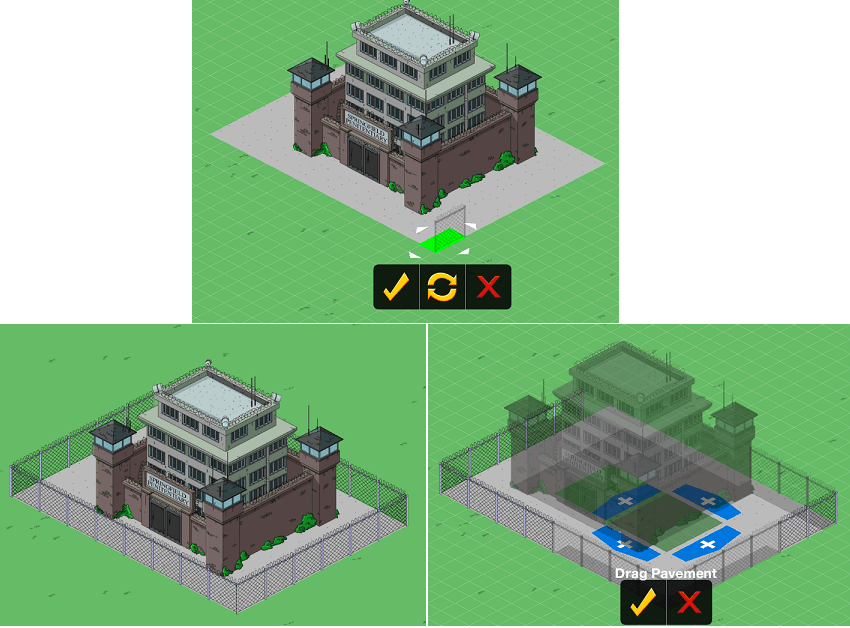
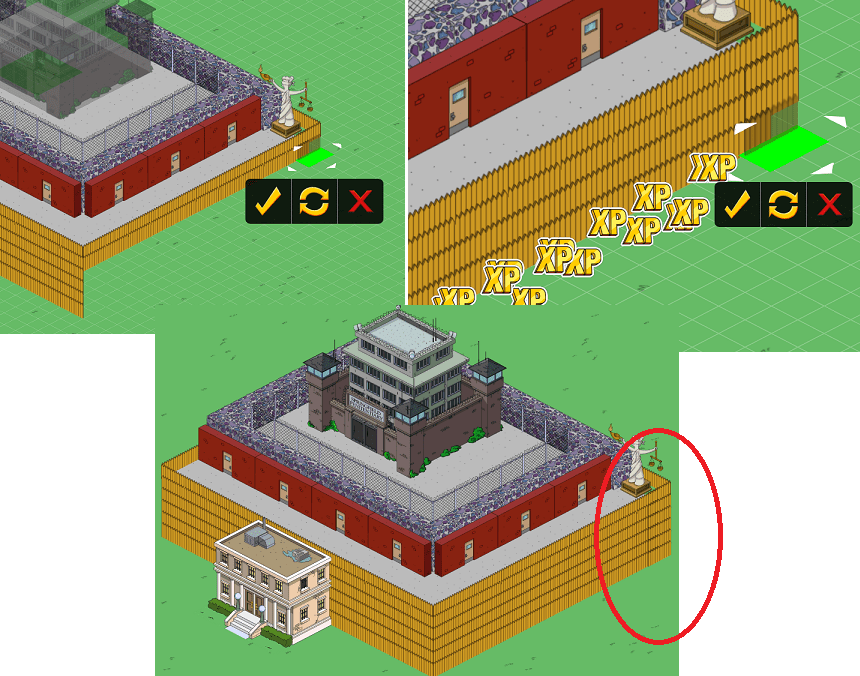
Next, using the cobblestone walls, line the bottom portion of the barbed wire fences. If you put the top edge of the wall directly in line with the bottom of the barbed wire fence, you start getting your first 3D effect. Once again, you can leave out walls on the back of the prison.
Draw a visual line in the bottom corner of the cobblestone walls and place training walls. This will leave a gap between them but it’s no big deal because you can easily fill the gap with one more wall. If you look at the bottom left image, you can see the training wall extends out past my walls. I took care of this by adding one more line of walls.
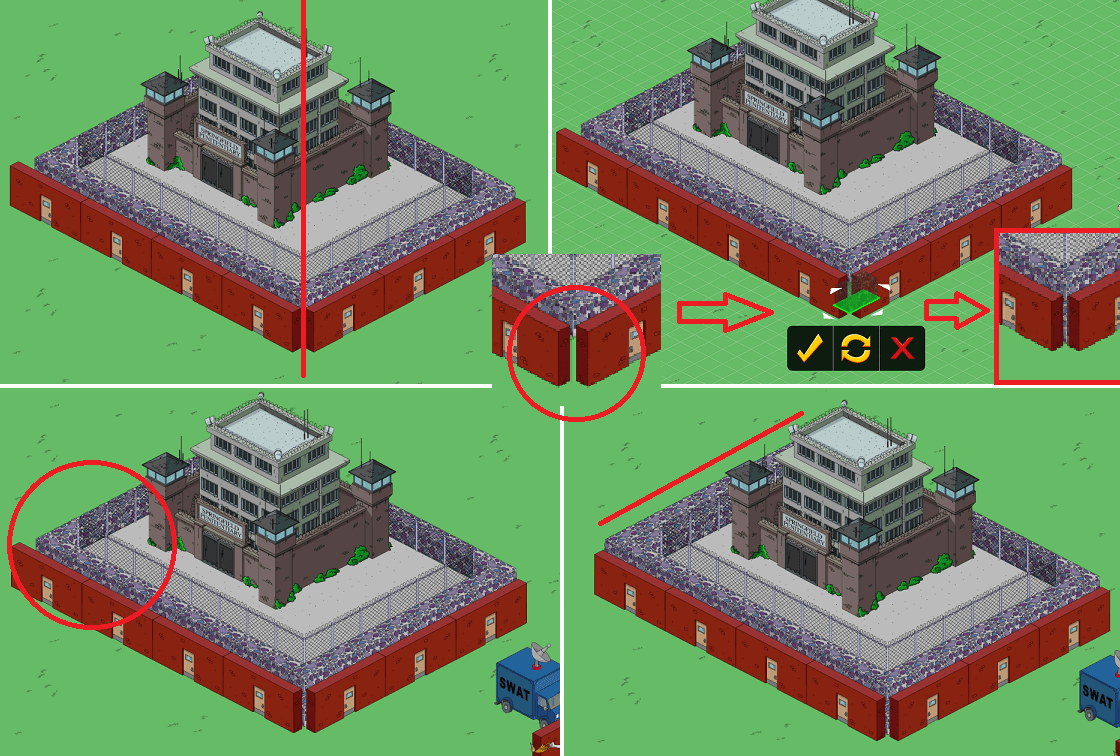
Once this was done, I extended my pavement under the training walls at started outlining it with brown fences. Face the walls away from the Penitentiary. I started to outline the back portion of the concrete but didn’t like the way it looked. This was fixed by adding more cobblestone walls to the top line.
If you follow that red line, you can see the additional cobblestone walls I placed. This made it really easy to complete the brown fencing. I had to face the two fences opposite each other so they could overlap.
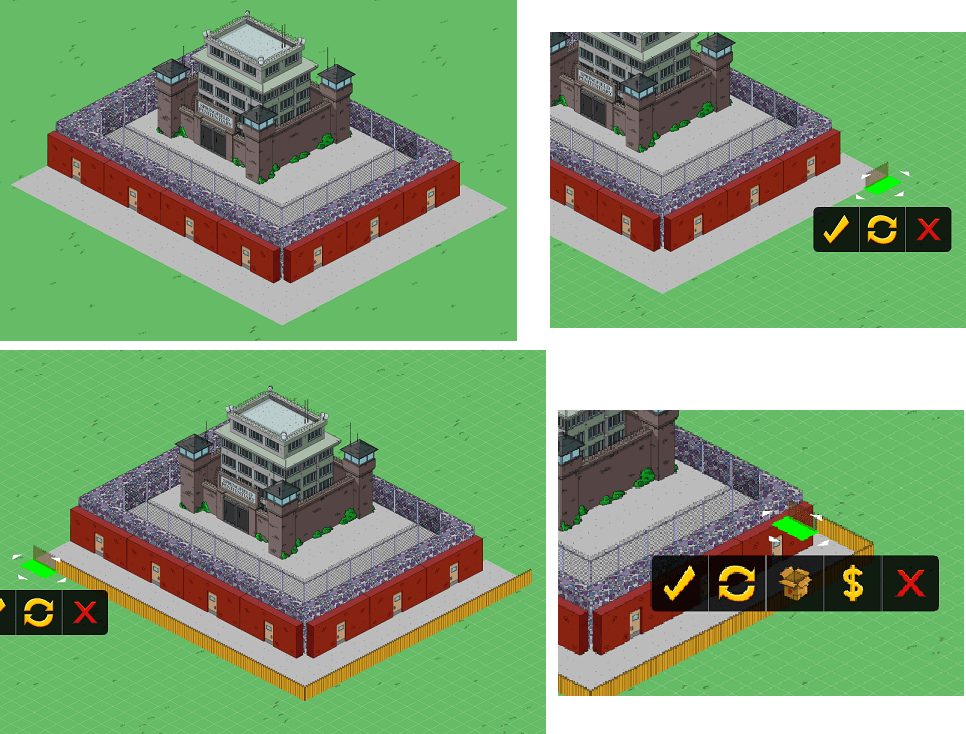
Ugh… an ugly green gap that makes my head hurt. Thankfully I was easily able to get rid of it by plopping Lady Justice right down on top of it.
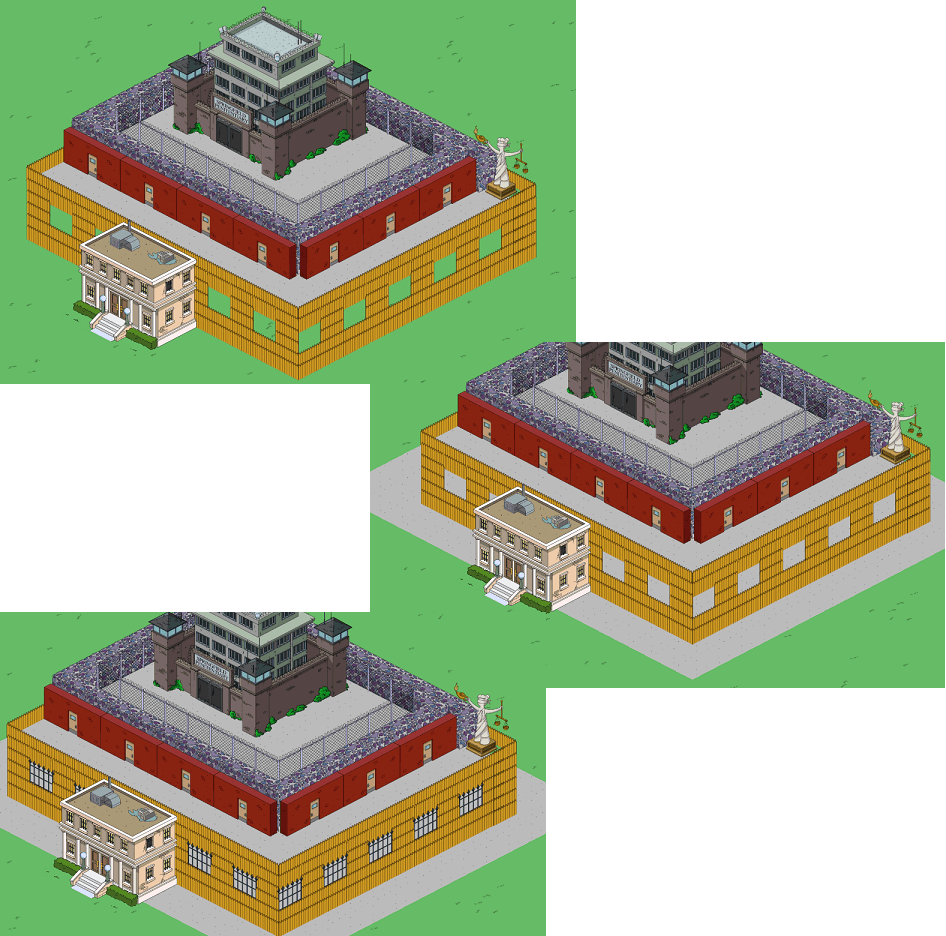
To continue one with the 3D effect, I placed the Police Station below my brown fencing to force the perspective. The it’s as easy as putting the fencing in (face them towards the prison) from right to left and then left to right until the brown fences lined up with the Police Station or were just behind it. Six total rows looked nice. See the center image to see where I left fences out.

To complete the other side of the building, keep creating rows with brown fences facing the prison. The only difference is your last fence will face away so you can create an edge.
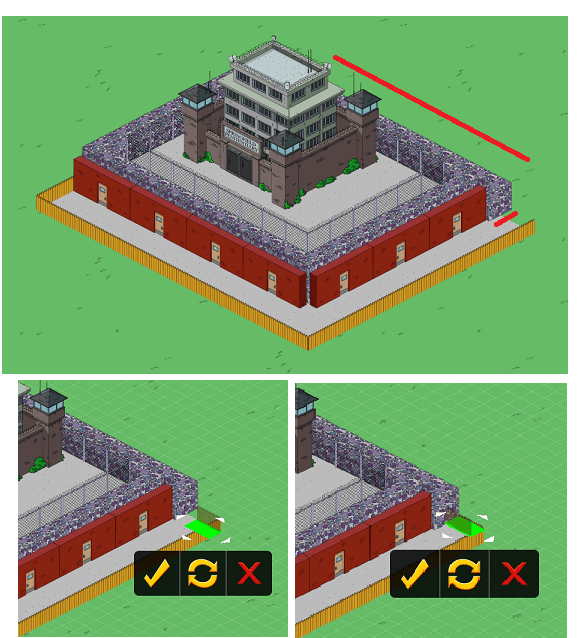
Now to put in some barred windows to make it look more prisony. That’s as simple as picking a spot and removing two fences on top of each other. Once your windows are set, outline the prison with more concrete, and then blace iron fences over the holes you made (facing inwards).
Almost done. Just to add more security, I placed barbed wire fence inside the bottom walls of brown fences. For the top left, the fences had to face outwards, but the long lines of fences are done with them facing inwards.
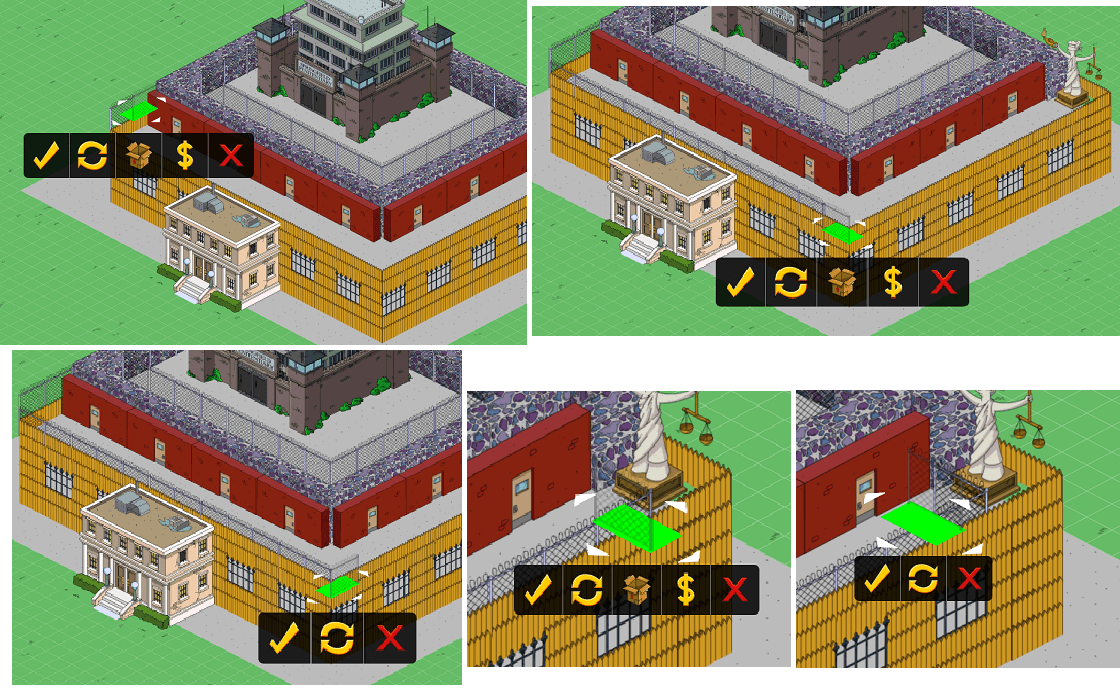
End the fences the same way we did the brown ones earlier. I liked the idea that the Lady Justice Statue would be blocked from the prisoners. Below you can see that the top left fences are a little out of place with the rest of the fencing.

To fix that I just put one fence facing inwards and then an iron fence. I think this looked much nicer.
And Voila! Your finished prison.
Ooooooooooooohhhhhhhhh…….aaaaaaaaaaaaaaaaaahhhhhhhhhh…….

The extra touches are all up to you. Add cop cars or the swat van. Place benches or greenery within the design. Put Lard Lad’s close by. Create an exercise yard. Deviate from the square design. The possibilities are staggering to me. This entire design took me less than an hour to make and looks a little different than the one in Wookieetown but I still love it.. The biggest thing is just making sure you have the money for all the decorations and the patience to do it. Some trial and error is definitely involved.
Well… happy tapping folks. Hopefully this all made sense. I had my sister read through it just in case so I guess you can blame any incomprehensibility on her lol. I’d really love to see some of your attempts at making a Mega Prison. If you like, share in the comments.
Y’all stay classy. TTFN… Wookiee out!
And that’s it for this 3D how-to! We hope you enjoyed the look back! Oh and if you’re looking for more of our 2D or 3D design guides you can check them out here: 2D here and 3D here.


I definitely miss when Tappers could 3-D their Springfield without limitations (I use to have an amusing Halloween Town back in 2014-2015). ♥️👍
I never thought that:
A) we’d run out of Land (or that it would require Tokens)
B) there’d be a Limit on how many Items
C) I’d be stuck with so much in Storage I can’t sell
Alas, one can look back upon (especially Levelling Up) fondly. 😉
Awesome work ! And the tutorial format is very impressive too.
Cool info, very creative use of items, I would have never thought of some of those things on my own, clearly I need to spend more time in the archives. 😁
~MIB🕵️
Really wonderful
This is what it’s all about, Not, grinding, lags and bugs, more time designing, very inspiring
Heeheehee…..looks like you’re up Neighborino!!!
😂🤣😂🤣😂🤣
WOW! That was a great! WIsh there were other posts of the same ilk. Maybe a certain addict, we all know, of might write a guest post. Every time a picture is posted of their work my jaw drops.